Ascending & Descending Fixed Lines
The vast majority of mountains climbed on commercial expeditions involve ascending and descending fixed lines. From the final few meters on Mera Peak to the continuous strand to the summit of Everest this lifeline allows folk to move independently of their guides, to descend quickly in the event of bad weather and as an important navigational aid.
High in the Himalaya you will see every sort of system imaginable - simple, complicated, over engineered and down right dangerous! From a single karabiner on some 4mm cord to a couple of jumars attached with daisy chains climbers all have their preferred method but usually with very little understanding of the forces involved and the limitations of their set up. Traverses and the inevitable traffic jams can all potentially increase the load on anchors and lines to breaking strain while jumars were not designed to stop falls. Fixed lines can and do break. On Khan Tengri In 2010 a line snapped on another climber, luckily without injury, five minutes after I'd finished climbing it.
High in the Himalaya you will see every sort of system imaginable - simple, complicated, over engineered and down right dangerous! From a single karabiner on some 4mm cord to a couple of jumars attached with daisy chains climbers all have their preferred method but usually with very little understanding of the forces involved and the limitations of their set up. Traverses and the inevitable traffic jams can all potentially increase the load on anchors and lines to breaking strain while jumars were not designed to stop falls. Fixed lines can and do break. On Khan Tengri In 2010 a line snapped on another climber, luckily without injury, five minutes after I'd finished climbing it.
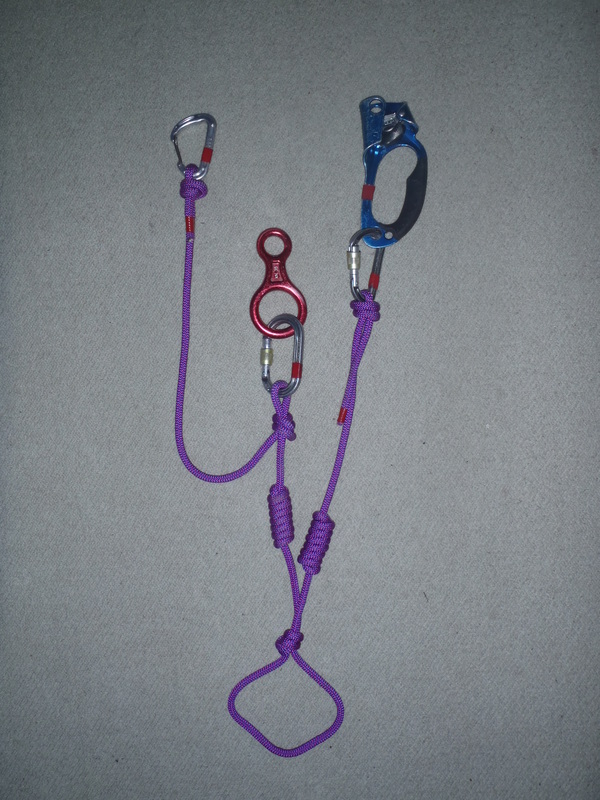
The Complete Fixed Line Set Up
|
The key criteria for my system are;
1. Simple to use when exhausted and or hypoxic 2. Very strong but lightweight 3. Some form of energy absorption in the event of a fall KIT LIST
|
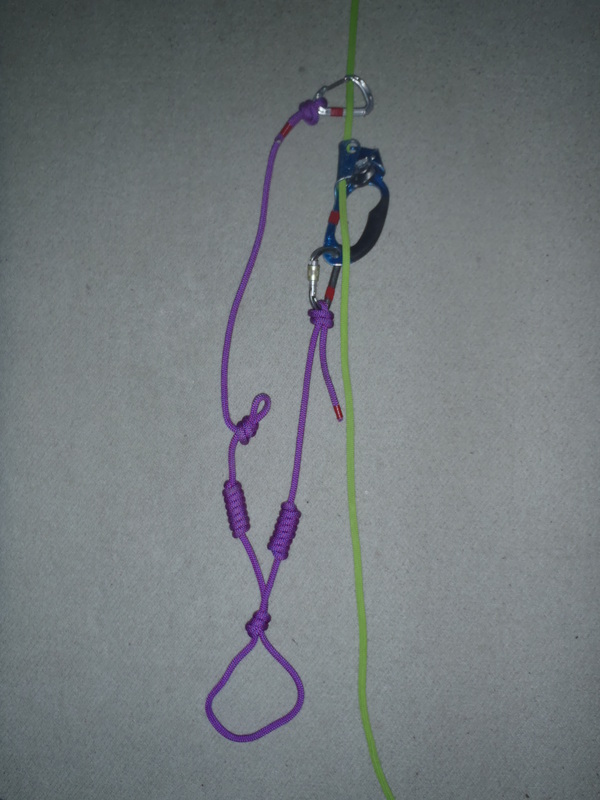
Ascending Fixed Lines
|
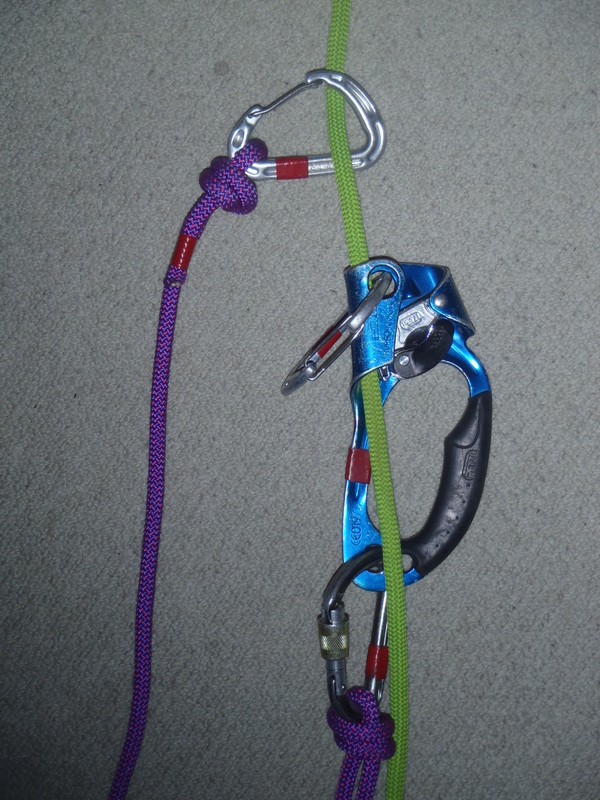
Designed with two cowstails this system means that you should never be totally unclipped from the fixed lines. When you arrive at an anchor unclip the cows tail and reclip it above the knot. You are now protected as you move the jumar. By running the cowstail above the jumar on the line you simply have to remember to move them around the anchor in the order that they arrive.
For extra security on more exposed climbs an additional karabiner can be placed through the ascender which locks the rope in place. Additionally clip your cowstail around all viable strands of rope |
Descending on Easy Terrain
|
Descending Easy scrambling or walking terrain where the consequences of a slide are not serious
Use with caution - very easy to lose control and slide to the next anchor sweeping everyone else before you! Use an arm wrap with leather palmed gloves. To improve your safety clip your karabiners around all viable strands of rope Only move one karabiner at a time around an anchor ie always stay attached to the mountain |
Descending by Abseil on Steep Terrain
|
Abseiling on fixed lines in the safest but slowest system on steep or climbing terrain. However it also means that no one else can abseil while you're weighting a section of the rope.
The key here is to abseil from the short cowstail loop. This is easier to rig when wearing a down jacket, allows you to use a prussick as a back up from your belay loop if required and makes it very easy to see if you have made a mistake. It also means that you have two hands on the controlling rope. In practice it is usually easier to abseil with the control rope between your legs rather than to the side. To improve your safety clip your cowstail around all viable strands of rope Instead of a prussick your climbing partner can protect you from below by holding the end of the rope and locking it off if necessary. |
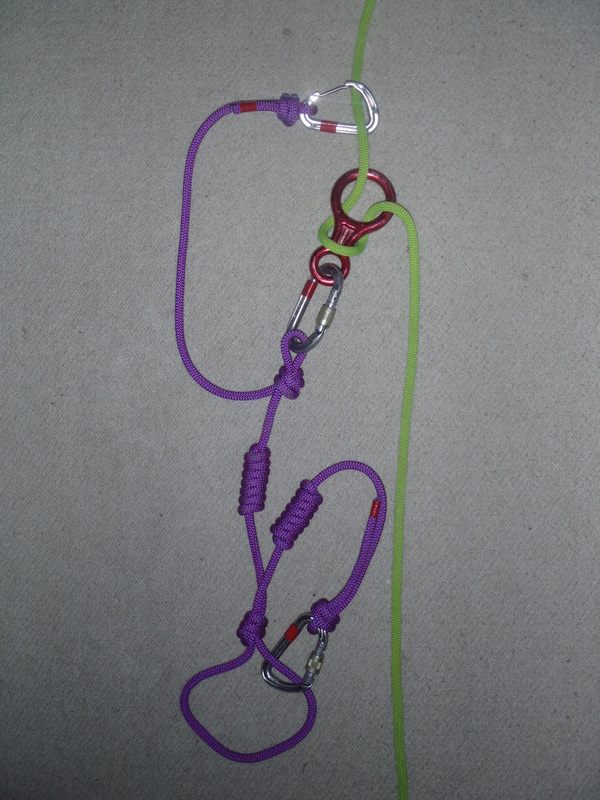
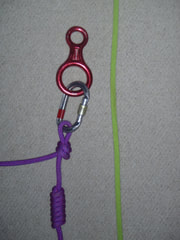
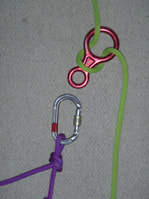
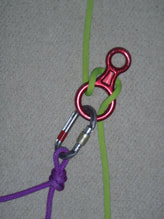
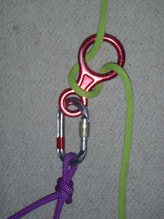
Rigging a Figure 8 Descender
|
This system reduces the likelihood of you dropping your descender when moving around anchor points
Fig 1. Attach the Fig 8 Descender to your short cowstail by its large hole. Fig 2. Thread a bight of fixed line UP through the large hole and away from you around the attachment point (small hole). Fig 3. Unclip the Fig 8 from the karabiner. It's still attached to the fixed line so you can't drop it. Roll the Fig 8 towards you (ie the small end will come over the top towards you) taking care not to introduce any twists in to the system. Fig 4. Now clip the karabiner into the small hole. Test the set up by abseiling a few centimeters, remove your cowstail and away you go. On fixed lines that are too tight or create too much friction it is also possible to abseil with the bight of rope clipped into the karabiner rather than round the Fig 8 although care is needed to ensure everything is kept in the correct orientation. At re-belays move your figure of 8 first remaining protected by your cowstail ie move things in the order they are moving along the rope |
Attaching your Ice Axe
|
The golden rule on fixed lines is to have your ice axe in your hand or clipped to your harness where it is accessible. Lines get damaged, traffic jams occur and people make mistakes at altitude and your ice axe is your get out of jail free card for when things get a little bit fraught. It's just excess weight if carried on the back of your rucksack and you won't be able to get it when you really need it.
In Scotland and Alpine mountains I opt to use my axe without a leash. However with big mitts, goggles, oxygen masks etc it would be very easy to drop it at altitude so I use an elasticated leash with attaches to the belay loop on my harness. |
